A Step-by-Step Guide to Designing Custom Hang tags for Emerging Labels
How do I design hang tags for an emerging fashion brand?
Hang tags are often the first physical touchpoint a customer experiences with your label. When designed thoughtfully, they shape buying decisions in seconds, communicate your brand identity, justify price, and help operations run smoothly as you scale. The goal is to create a tag that feels intentional, reads clearly in hand and in photos, and supports your brand story from the moment shoppers notice your product.
Why do hang tags matter for a new fashion brand?
Hang tags matter because they are a quick signal of credibility and readiness. They help customers place your product on a price and quality spectrum and convey your brand identity at a glance. In practice, a tag’s material, finish, and layout influence perceived value just as much as the product itself. Shoppers often decide in roughly three to seven seconds when they pick up an item and read the tag, so the first impression matters.
Tags influence practical aspects too. A tag that includes clear care, composition, and origin information supports reliable inventory, smoother returns, and faster retailer approvals. On the whole, well-executed tags communicate focus and professionalism, which can ease wholesale conversations and protect margins over time.
- Brand identity and tier: the tag signals where the product sits on price and quality through material, finish, and layout.
- Attention to detail and credibility: clear, complete information reads as a signal that the line is ready for shelves; missing details can make a brand look unprepared.
- Operational data and compliance: barcode, SKU, country of origin, and care notes keep inventory, customs, and returns moving smoothly across channels.
How do hang tags influence price perception and long-term brand equity?
A well crafted tag can influence perceived value and trust. It can justify a higher price point, reduce return friction, and speed acceptance by retailers when origin and certification are clearly stated. Over time, consistent, accurate tagging helps build shopper and buyer trust, which supports margin and eases wholesale discussions.
- Price framing: a thoughtful tag can help justify a higher perceived price point.
- Returns and customer trust: clear care and composition information reduces returns when customers know how to care for items.
- Provenance and compliance: explicit origin and certification references support sustainability claims and speed retailer approvals; inconsistent labeling can delay retail acceptance.
In practice, these effects compound. Early shoppers and buyers who see consistent tags are more likely to trust your label, which helps protect margins and smooths retailer conversations.
What essential elements should every custom hang tag include to make my brand stand out?
Include the core signals that establish identity and help buyers make quick decisions. Start with a clear brand mark, one concise product cue, and the practical data needed for use and resale. These elements build trust, support inventory and compliance, and give shoppers immediate signals to choose your product.
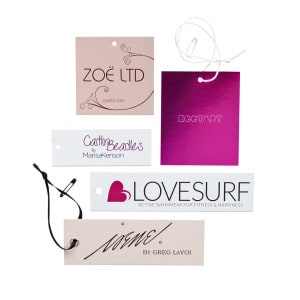
- Brand identity: a dominant logo and brand name for Printed logo hang tags
- One-line tagline or product cue: a single, tightly worded line that reinforces positioning
- Practical product data: SKU or style code, size, and a scannable barcode or QR
- Care and material details: concise care cues or fiber composition, or a link to full guidance
- Website or QR call-to-action: a URL or QR for extended content
- Certification and origin lines: if you claim sustainability or certified materials, show the shorthand and origin
- Required legal or retail fields: UPC/GTIN formats or retailer requirements as needed
Design basics that help these elements work together include a clear visual hierarchy, legible typography, clean layout with whitespace, and a format that supports the brand message without crowding the tag.
How do I translate my brand’s personality into a hang tag design?
Turn three clear brand adjectives into concrete design decisions. Focus on one dominant cue to own on the tag and support it with color, material, typography, shape, finish, and microcopy. Validate your choices with quick physical prototypes to ensure the look reads the same in hand and in photos.
- Define the personality and the dominant cue – pick three adjectives (for example: honest, modern, playful) and choose one as the dominant signal the tag must communicate at a glance.
- Map adjectives to materials and finishes – align choices with values, such as sustainability with recycled board, luxury with soft touch finishes, or bold with colored boards.
- Choose color and typography with hierarchy in mind – limit to one primary color and one accent; use one or two typefaces and establish a clear order: logo, product cue or line, then supporting info.
- Use shape and structure to differentiate – consider die-cut or folded tags to create differentiation while keeping readability intact.
- Write microcopy that reflects your voice – front: minimal visual elements; back or interior: a short brand cue, QR code, and essential notes.
- Consider attachments and small details – choose strings, eyelets, and fasteners that match the tag tone; these elements can register in photos and impact durability.
- Differentiate while staying authentic – ensure tag cues align with garment construction and interior labels for credibility with retailers and customers.
- Quick validation tests – hold prototypes in-hand, photograph under retail lighting, and test any QR or text for readability and scan reliability.
Notes on cost-effectiveness and return on attention suggest that a small tag can carry a high-value cue. Thoughtful stock or finish choices often deliver more perceived value than their incremental cost in photography and in-store handling.
Final checklist to translate brand personality into the tag:
- One dominant visual cue reinforced across material, color, type, and finish
- Limited typography to one or two fonts with legible body text
- Attachment method and hardware aligned with the tag tone
- Movement of story or CTA off the main face via QR or folded interior
- Prototype reviewed in-hand and photographed for context
What materials and shapes should I choose for my hang tags?
Start by deciding what signal the tag must convey first—brand tier, sustainability stance, or durability—and pick the simplest material and finish combination that communicates that signal and fits production constraints. Use a short decision framework to score options and eliminate choices that fail legibility, scan reliability, hole placement, or attachment method.
- Define priorities and non-negotiables – rank up to four priorities (prestige, eco credentials, low-cost prototyping, retail durability) and identify must-haves that rule out certain materials or finishes.
- Create a quick scoring matrix – compare candidate stocks and finishes across brand signal, durability, cost, and turnaround; give higher weight to brand signal for early-stage brands.
- Run practical checks – ensure the tag size supports hierarchy, and required fields fit legibly; confirm barcode/QR legibility and hole placement with templates; test durability and attachment methods with samples.
- Lock material and finish combos – choose a small set of repeatable combinations and reserve expensive finishes for essential cues to control cost while maintaining premium cues.
Material and finish tradeoffs to consider include:
- Paper versus recycled board: paper offers cleaner color, while recycled or kraft boards communicate eco cues; eco stocks are common for environmentally focused brands.
- Duplexed or thick boards: thicker boards read as higher value but cost more and may require special tooling; premium finishes often look better on heavier boards.
- Coatings and specialty finishes: matte, gloss, soft touch, foil, emboss/deboss; foil and embossing read as premium but may require higher minimums.
Shapes and sizes should support hierarchy and readability. Start with standard rectangles for efficiency, and consider die-cut or folded tags only if they reinforce the brand system. Ensure hole placement supports your chosen attachment method and that durable options like reinforced eyelets are considered for photography and handling.
Balancing aesthetics with budget and durability is essential. Run a short proof in your chosen stock, apply finishes selectively, and ensure the tag will hold up to retailer or consumer handling if you plan to sell through stores.
Should I use a designer, an online tool, or DIY my hang tags?
Choose based on your needs for brand precision, speed, and budget. A professional designer is best when you need a tailored identity signal and complex finishes; online tools are suitable for fast templates and predictable pricing; DIY is viable for rapid prototyping on small budgets if you can meet print-ready requirements.
- Designer: ideal for launch, premium positioning, or when finishes like foil or custom die-cutting for custom clothing hang tags are central to value. Benefits include bespoke visual hierarchy and production-ready files, with proofs and coordinated decisions across finish and labels. Drawbacks are higher fees and longer lead times.
- Online tools: best for fast templates, predictable pricing, and simple two-sided tags. Benefits include lower unit costs and quick turnaround; drawbacks include limited control over advanced print processes.
- DIY: useful for rapid prototyping, very small drops, or if you have design skills and print prepress knowledge. Benefits include fastest iteration and cost control; drawbacks include higher per-unit costs for small runs and risk of file errors if not familiar with prepress.
Real production numbers and timing to keep in mind:
- Cost for small digital prototype runs: approximately $0.25 to $0.60 per tag.
- Medium production runs: often $0.06 to $0.15 per tag depending on volume and finishes.
- Lead time for standard full production: 18 to 22 business days after artwork approval; rush digital options can be around 9 business days at higher per-unit cost.
When briefing partners, consider a quick decision flow: if you need specialty finishes and precise brand signals, hire a designer and a print partner who supports those finishes; if you need fast, low-cost tags, online tools or templates are viable; if you are validating copy or size with a few dozen to a few hundred samples, DIY or small-run proofs work well.
How do I vet designers, platforms, and print partners?
Vet partners by focusing on practical outcomes and process clarity. Look for portfolio alignment, proof policies, file support, minimums, pricing, and retail compliance experience. Ask for physical samples, clear proofs, and the ability to verify barcodes or QR codes at proof stage. Confirm that the partner can handle vector art, separated foil or spot layers if you plan specialty finishes, and provide reliable prepress checks.
- Portfolio and samples: request physical sample packs and recent work that matches your desired finish.
- Proof policy and turnaround: check rounds of revisions and typical proof lead time.
- File support and prepress checks: ensure vector art, foil/spot layers, and barcode/QR checks are supported.
- Minimums and pricing bands: ask for small-run pricing and growth thresholds for easy comparison.
- Retail compliance: choose partners familiar with UPC/GTIN, origin labeling, and retailer requirements to avoid rework and delays.
What are realistic costs and timelines for hang tag production?
Cost and timing can vary by volume and finish choices. Typical ranges include:
- Small digital prototype runs: around $0.25 to $0.60 per tag.
- Medium production runs: around $0.06 to $0.15 per tag, depending on quantity and finishes.
- Lead time for standard full production: 18 to 22 business days after artwork approval; rush options may be available in about 9 business days for small batches at a higher unit cost.
Prepare files with the printer’s guidelines in mind: logos as vector files, CMYK at 300 DPI, 2 mm bleed, and safe margins to keep critical text away from cuts; some finishes require separate foil layers or specific file formats.
Final practical recommendations
If timing and a premium signal matter, invest in a designer who will create production-ready files and manage finishes with a vetted printer. This approach protects the tag as a brand asset and reduces the risk of costly reprints.
If budget and speed are priorities, use reputable online printers with templates and sample packs. Order a small proof run (roughly 50 to 300 tags) to verify color, feel, and scanability before committing to a larger order.
If you are iterating product fit or copy quickly, start with a DIY prototype locally or via short-run digital options, then scale after you confirm legibility, barcode scanning, and attachment tests.
Remember, a well designed hang tag is a purposeful brand asset with a tangible effect on first impressions, returns, and retail conversations. Start with a simple data foundation, validate a tactile sample, and test a short digital run before committing to larger production.